 July 27, 2025
A guide to the WhatsApp Business CallBack
this article guide to the how to enble WhatsApp Business CallBack on Dxing Dashbord
WhatsApp Business Calling API is a new feature of the WhatsApp Business Platform that has been in limited beta release and is now formally released. It enables businesses to add Voice-over-IP (VoIP) calling to B2C interactions on WhatsApp that customers already use to message and make calls to friends and family.
WhatsApp recently implemented this feature, so only the Request voice callback feature is currently available in Dixing.
Enable the "Calls" Webhook in WhatsApp Developer App
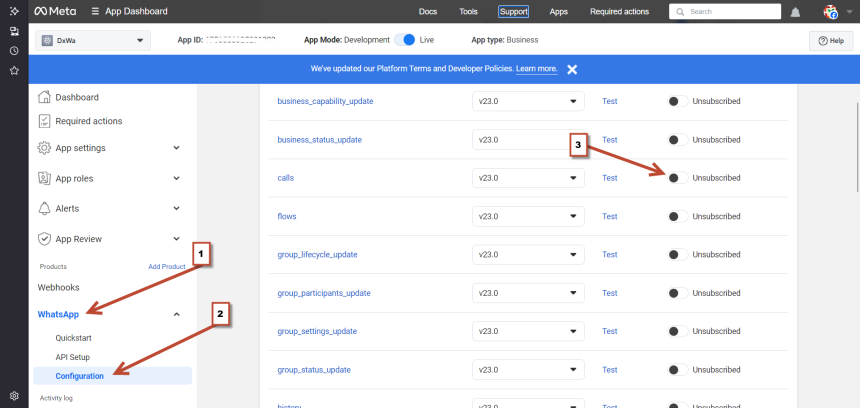
- 📌 Step 1: Add the WhatsApp Product
- Go to your App Dashboard on Meta for Developers.
- On the left-hand menu under Products, click Add Product (📍 labeled as 1 in the image).
- Select WhatsApp from the list and add it to your app.
📌 Step 2: Open the Webhook Configuration
- After adding the WhatsApp product, you’ll see it under Products.
- Click on WhatsApp > Configuration (📍 labeled as 2 in the image).
📌 Step 3: Enable the "calls" Webhook
- Scroll down to the Webhook fields list.
- Find the row labeled calls.
- Make sure the API version (e.g., v23.0) is selected.
- Click the toggle switch (📍 labeled as 3 in the image) to subscribe to the calls webhook event.
- It will change from Unsubscribed to Subscribed.
Enable Call Options in WhatsApp Business Manager
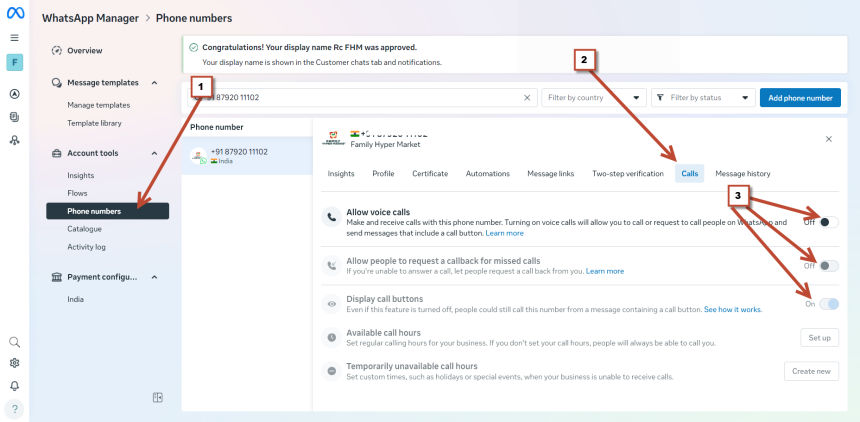
📍 Step-by-Step InstructionsStep 1: Go to Phone Numbers Section
- Navigate to WhatsApp Manager.
- From the left menu, click on Phone numbers (📌 labeled 1 in the image).
Step 2: Select Your Phone Number
- Click on the phone number you'd like to configure.
- You will see tabs like Insights, Profile, Certificate, etc.
- Click on the Calls tab (📌 labeled 2 in the image).
Step 3: Enable Call Features
You will see the following call settings:
- Allow voice calls
- Toggle the switch from Off to On (📌 labeled 3 in the image).
- This enables making and receiving calls on WhatsApp with this number.
- Allow people to request a callback for missed calls
- Toggle this ON to let users ask for a callback if you missed a call.
- Display call buttons
- Enable this to show a call button in your message templates and profile.
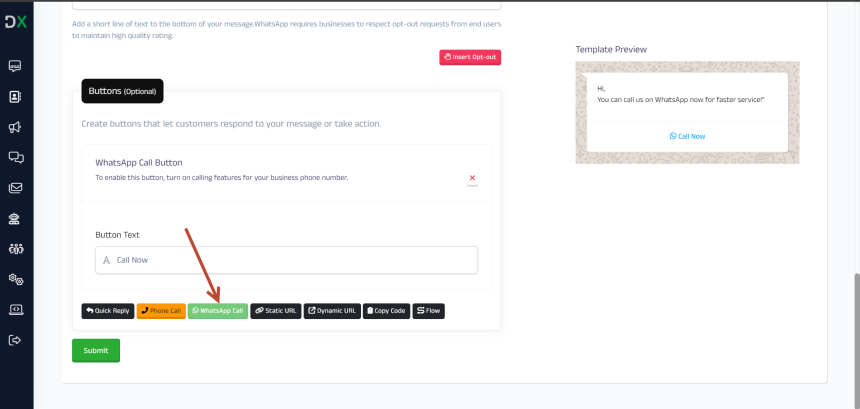
✅ Enable WhatsApp Call Button in a Template (Dxing Dashboard)
📌 Prerequisites:
- Voice Call feature must be enabled for your WhatsApp Business Number in WhatsApp Manager.
- 👉 Refer to the previous screenshots/tutorial steps to enable call features.
📍 Step-by-Step on Dxing DashboardStep 1: Go to Template Creation
- Open your Dxing Dashboard.
- Navigate to the Templates or Message Composer section where you create new templates.
Step 2: Add Button Section
- Under the Buttons (Optional) area, look for the option to add action buttons.
- You’ll see multiple button types:
- Quick Reply
- Phone Call
- ✅ WhatsApp Call (the green one you clicked—see red arrow in the image).
Step 3: Select "WhatsApp Call" Button
- Click on the "WhatsApp Call" button (green).
- In the field labeled Button Text, enter your call-to-action (e.g., “Call Now” or “Speak to Us”).
- On the right side, in the Template Preview, the button will appear with a WhatsApp Call icon and label.
Step 4: Submit Template
- Once you're satisfied with the message and the button setup:
- Click the green Submit button.
- Wait for WhatsApp (Meta) to approve the template.
 ✅ What’s Now Enabled
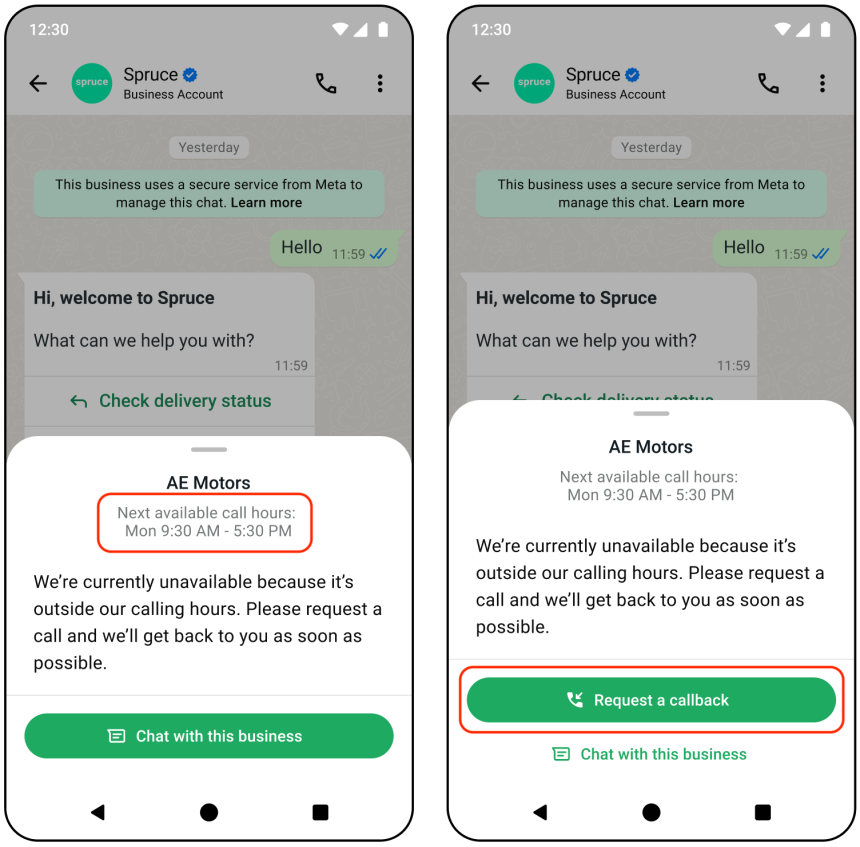
- When your business is outside the available call hours, users will see:
- Your next available call hours (as shown on the left image).
- A "Request a Callback" button (as shown on the right image).
- Customer taps “Request a Callback”
- A request is logged.
- You receive it via your WhatsApp API webhook (if configured).
- Your team can respond or place the call during business hours.
- Automated message can confirm receipt
- You can set up an auto-reply acknowledging the callback request.